* Transition screen - Screen that comes up when you move the issue from one status to another
3. Metrics
QMS of each organization will demand different set of metrics. Reports section in JIRA can be referred to get information about few of the progress measures. However Jira's create and Transition screens can be designed to capture more measures
One of our delivery team wanted to verify the % of defects identified through automation. While the total count of defects info was available, details on defect source was not captured . A simple solution was to add a field to the defect's create screen to capture the measure.
JIRA design
Issue type : Defect
Screen ( Create / Transition) : Create
Field Name : Defect source
Field Type : Single select list
List item : Manual, Automation
Optional / Mandatory : Mandatory
4. Good Practices
Good practices and lessons learnt is not only for the process and practices, it could also be shared for tools. In an organization where JIRA is widely used, knowledge sharing should be encouraged for JIRA. More specifically when you are working towards and adhering to certifications like ISO / CMMi, knowledge sharing in JIRA implementation will be supportive.Add on the good practices which would suit your requirement to the list
When do you want the user to give data
Now that you have gathered details on what that you need to collect, the next step is to decide on when do you want to collect the information. Data can be collected while creating the issue , transitioning the issue and it can also be automated during the transitions.
1. On Issue creation
"Create" is the first step in Jira to log the issue. All the available information on the source of the issue can be logged into the create screen
2. During Transition
Delivery Manager wanted to have the first level of causal analysis in the defect workflow, to improve the RCA effectiveness. We decided to collect this information while the developer is transitioning the defect to tester
JIRA design
Issue type : Defect
Screen ( Create / Transition) : Transition screen while moving the defect to tester for verification
Sample Screen
3. Automate the data collection
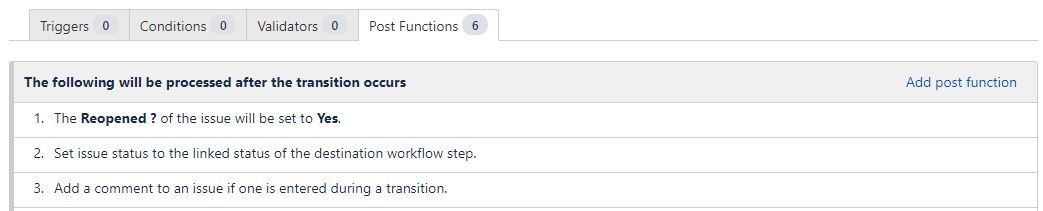
If the delivery team wanted to have a check on the number of re-open defects, it will be a tiresome task to check on the history of each defect and confirm the re-open status. To solve this issue,re-open status was added to post function of the testers transition. Now whenever a defect is re-opened by the tester, the status of the re-open status field will be updated as "Yes". This information can be easily extracted from JIRA dump
JIRA design
Issue type : Defect
Screen ( Create / Transition) : None
Field Name : Re-open status
Field type : Single select list
Field options : Yes, No
Default selection : No
Transition name : Re-open defect ( This is the transition to send the defect back to developer as the defect is not fixed properly. The transition name can vary )
Automation : While the tester clicks on " Re-open defect" transition, the value of the "Re-open status" field changes to "Yes"
Post functions configuration - Sample
How do you want to collect the data
1. Choose the field type
Jira offers different types of custom field to collect the information.
Once, we were customizing JIRA for a client, who wanted the options to be in radio button than select list. The reason being, they have observed more possibility of error in select list.
Similarly, the teams can decide on how to collect their respective information
Note : Fields designed as free text, will not be listed in the dashboard gadgets
Below is the representation of how you can collect the same data in multiple ways
2. Tab it
Grouping similar information under tabs is a good practice which will improve the user experience. Tabs can be added to the create screen and to the transition screens.
With more fields in a single tab the user will have to scroll up and down which will be an inconvenience. Consolidating similar information under separate tab's will improve efficiency
Consolidating
User experience and Issue logging effectiveness can be improved using the techniques listed above. To re-emphasize, out of all other parameters in Jira, "Screens" are visible and interactive to the end user. Designing of screens should be more thoughtful to ensure better experience.
Happy JIRAing 😀
There is always more to learn in JIRA, Share in your views and experiences in JIRA designing. In the blog up here I have just shared few sample scenario's, for any support on specific JIRA screen design or any other JIRA activities do comment in. Look in this space for more sharing's related to JIRA
Did you know ?
- JIRA was named against the Japanese word Gojira which means Godzilla
- JIRA was used for the Falcon 9 Space X project.
Twitter video : https://twitter.com/i/status/1266825571104747521


Looks informative, good work
ReplyDeleteThank You Siva
DeleteInteresting! Can you cover from the basics ie from the architecture from a 10k feet view to then into each of the modules?
ReplyDeleteSure. That will be a good logical flow
DeleteFantastic illustration and very lucid. Thanks for sharing.
ReplyDeleteThank You Pitchai
DeleteGood job Prabha. Do cover the basics of Jira and then explain each module seperately. This could be worth a lot
ReplyDeleteGood work Prabha.
ReplyDeleteFelt some logical flow is missing, but the content is interesting and informative to me